#目录
| Level 1 | Level 2 | Level 3 | Level 4 | Level 5 |
| Level 6 | Level 7 | Level 8 | Level 9 | Level 10 |
| Level 11 | Level 12 | Level 13 | Level 14 | Level 15 |
| Level 16 | Level 17 | Level 18 | Level 19 | Level 20 |
#Level 0
238=274877906944
替换地址为http://www.pythonchallenge.com/pc/def/274877906944.html,会自动跳转到正式关卡
#Level 1
题目很明确,平移加密。对图片下方的紫色文字进行加密
1 | line = "g fmnc wms bgblr rpylqjyrc gr zw fylb. rfyrq ufyr amknsrcpq ypc dmp. bmgle gr gl zw fylb gq glcddgagclr ylb rfyr'q ufw rfgq rcvr gq qm jmle. sqgle qrpgle.kyicrpylq() gq pcamkkclbcb. lmu ynnjw ml rfc spj." |
得到处理后的句子为
i hope you didnt translate it by hand. thats what computers are for. doing it in by hand is inefficient and that's why this text is so long. using string.maketrans() is recommended. now apply on the url.
OK,对网页链接map进行同样的操作,即可得到第二题的地址
另外注意到,很明显我的平移ascii的加密方式并不是它所提示的str.maketrans(),那么maketrans()实现了什么功能呢?原文放在这里好了,简单来说,就是生成一个转换方法,然后用str.translate()进行转换。传入不同数量的参数时会对应生成不同的转换方式,试试看
1 | line = "g fmnc wms bgblr rpylqjyrc gr zw fylb. rfyrq ufyr amknsrcpq ypc dmp. bmgle gr gl zw fylb gq glcddgagclr ylb rfyr'q ufw rfgq rcvr gq qm jmle. sqgle qrpgle.kyicrpylq() gq pcamkkclbcb. lmu ynnjw ml rfc spj." |
i hope you didnt translate it by hand. thats what computers are for. doing it in by hand is inefficient and that's why this text is so long. using string.maketrans() is recommended. now apply on the url.
OK,相同的结果
#Level 2
题目给的也很明显了,要查看网页源码,发现find rare charactors below的注释,那么就是这里了
为方便处理,将这一大段字符存入assets/txt_for_2.txt,开始统计字符出现的次数即可
1 | from collections import Counter |
得到结果
Counter({')': 6186, '@': 6157, '(': 6154, ']': 6152, '#': 6115, '_': 6112, '[': 6108, '}': 6105, '%': 6104, '!': 6079, '+': 6066, '$': 6046, '{': 6046, '&': 6043, '*': 6034, '^': 6030, '\n': 1219, 'e': 1, 'q': 1, 'u': 1, 'a': 1, 'l': 1, 'i': 1, 't': 1, 'y': 1})
OK,只出现一次的字符组合起来即为下一题的地址,替换代入即可
#Level 3
题目也很直白,正则匹配。源码是必须要看的咯,又发现一大篇字符。上手!
1 | import re |
得到结果linkedlist,替换地址。嘿嘿,瞧嘛,下一题的地址还有点区别了^.^
#Level 4
页面上什么都没有了,图片有超链接,点击后进入页面显示the next nothing is 44827,抬头看一眼地址,voila!
地址改为...?nothing=44827,嗯,又来了,the next nothing is 45439。看样子是要一个页面一个页面地跳转了。需要用到http请求类的模块了
1 | import requests |
等待一个比较合理的输出结果就可以了
#Level 5
pronouce it.
自然还是要看源码,图片地址为"peakhell.jpg",下面还有一段页面上不显示的内容
1 | <peakhell src="banner.p"> |
地址替换为banner.p试试。又得到一大篇不明所以的字符
回到开始,"pronounce it",python有一个用于序列化和反序列化的模块名为pickle,应该就是了
1 | from urllib import request |
得到一个二维列表,粗略看一下,前三行的数字加在一起都为95,有可能代表字符出现的次数
1 | for i in result: |
得到结果
#Level 6
zip,压缩文件?拉链?
地址替换为*.zip,哦,下载了文件名为channel.zip的压缩包。解压,发现readme.txt,嗯,和第四题有异曲同工之妙
1 | PATH = 'assets/channel/' |
发现程序出错了,出错前最后一个文件内容为
collect the comments.
zip comment是个嘛呢,google一下:
A comment is optional text information that is embedded in a Zip file. ->source
用7zip打开压缩包,可以查看注释,发现压缩包里的文件均有一个字符长度的注释,有的是空格,有的是字母,那看样子是要用python对压缩包文件进行处理啦,用zipfile模块
1 | import zipfile |
用hockey替换地址,页面显示it's in the air. look at the letters.emm,无需多言
#Level 7
emm,就一张图片,源码也没有信息了,那么信息还是在图片中,用opencv试试
注意到在图片中部有一横条是都为灰黑色,与图片整体极不和谐,从这里下手。用截图工具逐像素平移观察,发现大概7到9个像素后色块颜色发生改变,那就逐一试一下
1 | import cv2 |
得到结果
offset = 7: [115, 109, 97, 114, 116, 32, 103, 117, 121, 44, 32, 121, 111, 117, 32, 109, 97, 100, 101, 32, 105, 116, 46, 32, 116, 104, 101, 32, 110, 101, 120, 116, 32, 108, 101, 118, 101, 108, 32, 105, 115, 32, 91, 49, 48, 53, 44, 32, 49, 49, 48, 44, 32, 49, 49, 54, 44, 32, 49, 48, 49, 44, 32, 49, 48, 51, 44, 32, 49, 49, 52, 44, 32, 49, 48, 53, 44, 32, 49, 49, 54, 44, 32, 49, 50, 49, 93]
offset = 8: [115, 109, 97, 114, 116, 103, 117, 121, 44, 32, 121, 111, 32, 109, 97, 100, 101, 32, 105, 46, 32, 116, 104, 101, 32, 110, 120, 116, 32, 108, 101, 118, 101, 32, 105, 115, 32, 91, 49, 48, 44, 32, 49, 49, 48, 44, 32, 49, 54, 44, 32, 49, 48, 49, 32, 49, 48, 51, 44, 32, 49, 52, 44, 32, 49, 48, 53, 44, 49, 49, 54, 44, 32, 49, 50, 93]
offset = 9: [115, 109, 97, 116, 32, 103, 121, 44, 32, 121, 117, 32, 109, 100, 101, 32, 105, 46, 32, 116, 101, 32, 110, 101, 116, 32, 108, 118, 101, 108, 32, 115, 32, 91, 48, 53, 44, 32, 49, 48, 44, 49, 49, 54, 44, 49, 48, 49, 32, 49, 48, 51, 32, 49, 49, 44, 32, 49, 48, 44, 32, 49, 54, 44, 32, 49, 49, 93]
尝试将这些数字视作ascii码转为字符
1 | s1 = [chr(i) for i in l1] |
得到结果
offset = 7: smart guy, you made it. the next level is [105, 110, 116, 101, 103, 114, 105, 116, 121]
offset = 8: smartguy, yo made i. the nxt leve is [10, 110, 16, 101 103, 14, 105,116, 12]
offset = 9: smat gy, yu mde i. te net lvel s [05, 10,116,101 103 11, 10, 16, 11]
这样结果很明显了,offset=7得到的结果再进行一次ascii码转换即得到下一题地址
#level 8
图片蜜蜂身体部分带有链接,点击发现需要登录。网页源码发现注释
1 | un: 'BZh91AY&SYA\xaf\x82\r\x00\x00\x01\x01\x80\x02\xc0\x02\x00 \x00!\x9ah3M\x07<]\xc9\x14\xe1BA\x06\xbe\x084' |
自然对应的就是user name与password了,这串字符呢,是bzip2压缩过后的结果,那么解压就能得到原来的样子啦
1 | import bz2 |
得到结果
b'huge'
b'file'
#Level 9
网页标题叫connect the dots,源码中发现了一长串注释:first+second=?,以及各自后面的一串数字,那么应该是用这两串数字作为坐标咯
1 | import cv2 |
事实证明,网页原图片是用不到的,直接生成一个纯色图片就可以
1 | img = np.zeros((512,512,3), np.uint8) |
得到结果
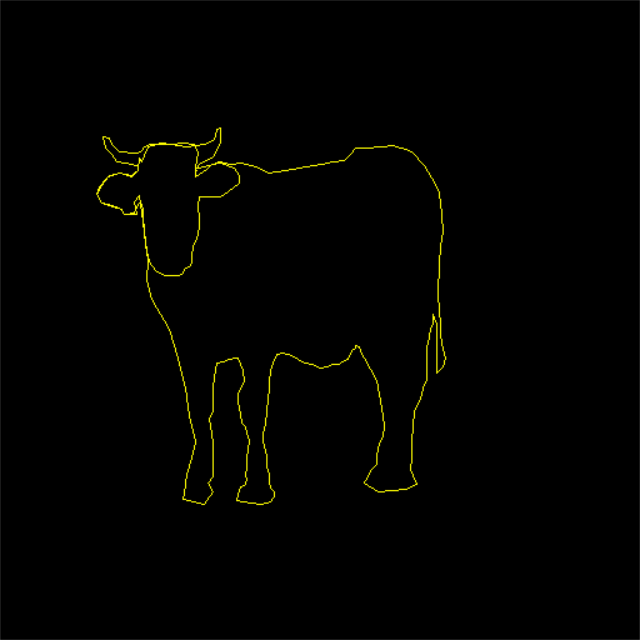
那么是cow/bull/ox/cattle,尝试几次就知道了
#Level 10
发现图片牛身体部分带有链接,点击发现一个未收尾的list,a = [1, 11, 21, 1211, 111221,。
没有系统刷过算法的我一时间没有看懂这是什么排列,搜索1, 11, 21, 1211, 111221后发现,原来这叫做Look-and-say sequence。好嘛知道这是什么东西了就好弄了,上手
1 | a = ['1'] |
得到下一题地址
#Level 11
odd even,奇偶数,只有一张图片,那么自然还是要进行图片处理
对两坐标数值之和进行奇偶分类,分离图像
1 | import cv2 |
得到"even"图像右上角的文字即为下一题地址
#Level 12
dealing evil,有点摸不到头脑
图片源地址为evil1.jpg,会有evil2,evil3,甚至evil4,evil5吗,试试。
evil2.jpg显示not jpg, _.gfx
.gfx是什么意思呢,google一下
The GFX file type is primarily associated with Cue Club Image File. ->source
可以理解为是个图片类的扩展名,把evil2.jpg改为evil2.gfx果然是个文件链接。
再试试evil3.jpg,OK,显示no more evils了,那应该信息在evil2.gfx和evil1.jpg这两个文件当中了(还是需要继续尝试的,下一题需要)
打开evil2.gfx,尝试直接转为evil2.jpg
1 | with open("assets/evil2.gfx", "rb") as f: |
emm,打不开
众所周知dealing有发牌的意思,尝试如果把evil2.gfx中的信息逐字节分别注入到若干个文件中打开
从分为2个文件,一路尝试到分为5个文件,终于出现了能够读取的图像,连在一起即为下一题地址
1 | with open("assets/evil2.gfx", "rb") as f: |
wait,那么evil1.jpg的作用是什么?找来找去看到图中发的牌都为5,大概是个线索吧,虽然被我忽略了...
#Level 13
按键5处有链接,得到一个xml文件。
说实话,这题我是从网上找的解析,触及我盲区了。这里补充一些自己的理解
xml-rpc就是一个post请求,形式为xml格式,执行结果也会以xml格式返回。python中执行这类操作有标准模块xmlrpc.client和xmlrpc.server,二者作用一目了然,这一题要用到的即为xmlrpc.client模块
1 | import xmlrpc.client |
构建好ServerProxy对象后利用system.listMethods方法查询服务端提供的method
1 | print(post.system.listMethods()) |
得到
['phone', 'system.listMethods', 'system.methodHelp', 'system.methodSignature', 'system.multicall', 'system.getCapabilities']
其中phone看起来是这个服务端特有的一个method方法,用system.methodHelp查询该method的作用
1 | print(post.system.methodHelp("phone")) |
Returns the phone of a person
OK,需要的method也知道了,现在还缺少的条件就是person了。在网上查了一下才看见,原来上一题的evil4.jpg是有信息的,怪我太单纯,相信了它的鬼话。但是只有ie浏览器能够访问,或者利用curl语句获取,即为此题person的名字"Bert"
查询结果为
555-ITALY
#Level 14
结合walk around以及上方图片,应该与绕圈圈或者螺旋有关。下面的条形码(?)图片应该就是要处理的图片了。网页源码中带有注释
remember: 100*100 = (100+99+99+98) + (...
而且注意到wire.png在浏览器DevTools中的信息:
Rendered size:100 × 100 px
Rendered aspect ratio:1∶1
Intrinsic size:10000 × 1 px
Intrinsic aspect ratio:10000∶1
File size:15.9 kB
Current source:http://www.pythonchallenge.com/pc/return/wire.png
它并不是100px*100px的图片,而是10000px*1px的图片
那么这个等式代表什么呢?
举个简单的例子,一张5px*5px的图片,从最外侧沿直线一圈一圈螺旋状向内绕,如下图沿同颜色的色块走到边界然后转弯
那么以每次转弯为边界,每次走过的像素数依次是5,4,4,3,3,2,2,1,1
拓展到100px*100px的图片,那么上面的等式就能补全了
100*100 = 100+99+99+98+98+97+97+...+3+3+2+2+1+1
=(100+99+99+98)+(98+97+97+96)+...+(5+4+4+3)+(3+2+2+1)+1
那么要对wire.png进行的处理即为螺旋式将10000个像素逐个填入到100px*100px的图像当中咯
1 | import cv2 |
voila~,诶他叫uzi,替换地址就是下一题了
#Level 15
首先直接上结论,著名音乐家Mozart
为什么呢?注释里说
todo: buy flowers for tomorrow
然后我就去查了1月27日出生的名人,so,第一个就是WOLFGANG AMADEUS MOZART,然后就进入下一题了.....
OK,回过头分析一下这道题,针对结果给出过程了属于是
首先1月27日肯定是个大日子没错了,注意图片右下角中的下月预览,共29天,那么这一年(1XX6年)是个闰年,而且当年1月1日为周四。再结合
he ain't the youngest, he is the second
也就是求从当今向前推,第二个最后一位数为6的闰年咯,虽然已经知道答案是1756了,但当然还是要做一下
1 | import calendar |
#Level 16
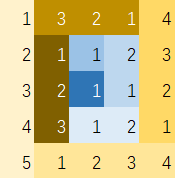
Let me get this straight
看上去应该是把这些粉/紫色的色块对齐?大概看了一下,前面四行像素中都只有一个粉/紫色块,那应该就是这样了。用截图工具逐像素查一下,发现这些粉/紫色块长度都为5个像素,那么接下来就容易了。
opencv无法处理.gif文件,所以花了点时间简单学习了下pillow的使用
首先要确定每行中粉/紫色块的位置(即其所在像素在整个像素行list中的索引值),只需在一行像素中找到连续5个值完全相同的像素即可。
1 | from PIL import Image |
195
那么需要找的像素值就应该是195了。找到这个像素后将此像素之前的部分全部切下接到整行像素的末尾试一下
1 | from PIL import Image |
芝麻芝麻~
#Level 17
诶,主图左下角的部分好像见过,是第四题的图,那么,又是一道网页请求类的题目?
查看网页cookies
you%20should%20have%20followed%20busynothing...
看样子应该是把第四题的首个地址改为...?busynothing=12345然后进行网页请求咯
然而并不是,除了一句that's it什么也没得到,猜测这可能是循环请求结束的节点。或许是要读取cookie内容?
1 | import re |
BZh91AY%26SY%94%3A%E2I%00%00%21%19%80P%81%11%00%AFg%9E%A0%20%00hE%3DM%B5%23%D0%D4%D1%E2%8D%06%A9%FA%26S%D4%D3%21%A1%EAi7h%9B%9A%2B%BF%60%22%C5WX%E1%ADL%80%E8V%3C%C6%A8%DBH%2632%18%A8x%01%08%21%8DS%0B%C8%AF%96KO%CA2%B0%F1%BD%1Du%A0%86%05%92s%B0%92%C4Bc%F1w%24S%85%09%09C%AE%24%90
emm,看开头像是之前做过的bzip2压缩,但是编码有问题。
1 | line = urllib.parse.unquote_to_bytes(cookies) |
得到结果
b'BZh91AY&SY\x94:\xe2I\x00\x00!\x19\x80P\x81\x11\x00\xafg\x9e\xa0 \x00hE=M\xb5#\xd0\xd4\xd1\xe2\x8d\x06\xa9\xfa&S\xd4\xd3!\xa1\xeai7h\x9b\x9a+\xbf`"\xc5WX\xe1\xadL\x80\xe8V<\xc6\xa8\xdbH&32\x18\xa8x\x01\x08!\x8dS\x0b\xc8\xaf\x96KO\xca2\xb0\xf1\xbd\x1du\xa0\x86\x05\x92s\xb0\x92\xc4Bc\xf1w$S\x85\t\tC\xae$\x90'
这回看上去和bzip压缩后的结果很像了,解压
1 | print(bz2.decompress(line).decode("utf-8")) |
is it the 26th already? call his father and inform him that "the flowers are on their way". he'll understand.
call his father,结合26th,那么应该是Mozart的父亲咯,在网上查了一下名叫Leopold,call自然是13题中的phone方法
1 | import xmlrpc.client |
555-VIOLIN
替换.../violin.html试试
no! i mean yes! but ../stuff/violin.php.
继续修改网址。emm,网页题目叫it's me. What do you want?,内容是Leopold Mozart的画像。要做什么就很明了了
1 | import requests |
得到结果
1 | <html> |
替换为balloons即得到下一题地址了,哦对了,是在第17题题目的地址上替换,不是在Leopold画像的网页地址上替换
#Level 18
Can you tell the difference?
两张图片,亮度略有差别。源码中带有注释
it is more obvious that what you might think
那既然这么说,就试试luminance/brightness咯。brightness.html页面没有区别,注释中内容变为了
maybe consider deltas.gz
替换地址,得到deltas.gz文件。处理.gz文件要用的应该就是gzip模块了
1 | import gzip |
得到的结果很有意思,分为了两栏,但行数有所差别,或许要比较的是这两栏的区别?那么要用的就是difflib模块咯,去学习一下
1 | import gzip, difflib |
得到结果
l1: ['89 50 4e 47 0d 0a 1a 0a ...]
l2: ['89 50 4e 47 0d 0a 1a 0a ...]
common: ['89 50 4e 47 0d 0a 1a 0a ...]
熟悉png文件结构的话已经看出比对出的三个结果应该怎么处理了。
三个结果起始的八个字节正是png文件的文件头(signature)->source
下面将三个结果分别存储为png文件,即得到下一题的地址、账号与密码。
1 | with open('assets/lvl18_1.png', 'wb') as f1: |
#Level 19
一张印度地图,以及网页注释中的一封邮件
看样子是要处理音频?而且说明了用base64进行编码,要用的自然就是base64.b64decode()了
1 | import base64 |
得到音频为
Sorry!
改地址试一下
- "what are you apologizing for?"
看上去不对,有被忽略的线索。
对音频信息不是很了解,正好借刚刚的indian.wav这个文件学习一下wave模块和相关的参数含义
1 | import wave |
_wave_params(nchannels=1, sampwidth=2, framerate=11025, nframes=55788, comptype='NONE', compname='not compressed')
大概是:单声道,采样率2byte,帧率11025hz,共55788帧,无压缩
注意到图片中陆地颜色和海洋颜色相反,reverse?尝试将音频整体翻转
1 | import wave |
得到的结果什么也听不出来,不对。尝试逐帧反转
1 | import wave |
"you are an idiot~ ah, ah, ah, ah ...
虽然,但是,有被冒犯到...
替换网址,即得到进入下一题的链接
#Level 20
属于是一点头绪都没有,此题参考了网上的解析,也通过此题学习了一下有关响应头中Content-Range以及请求头中Range的知识。这两项一般常见于断点续传和多线程下载
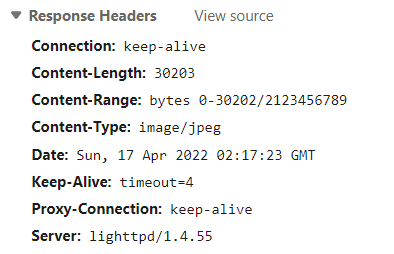
上图为本题主图unreal.jpg的响应头,表示当前文件的范围,修改请求头中的Range值即可访问其他范围的文件
现在已经知道0-30202区间为图片unreal.jpg,继续访问下一段。设置Range值为bytes=30203-
1 | import requests, base64 |
{'Connection': 'close', 'Content-Length': '34', 'Content-Range': 'bytes 30203-30236/2123456789', 'Content-Transfer-Encoding': 'binary', 'Content-Type': 'application/octet-stream', 'Date': 'Mon, 18 Apr 2022 10:22:00 GMT', 'Server': 'lighttpd/1.4.55'}
Why don't you respect my privacy?
继续修改range值
1 | headers = {'Authorization': f"Basic {cred.decode()}", 'Range':'bytes=30237-'} |
{'Connection': 'close', 'Content-Length': '47', 'Content-Range': 'bytes 30237-30283/2123456789', 'Content-Transfer-Encoding': 'binary', 'Content-Type': 'application/octet-stream', 'Date': 'Mon, 18 Apr 2022 10:55:42 GMT', 'Server': 'lighttpd/1.4.55'}
we can go on in this way for really long time.
1 | headers = {'Authorization': f"Basic {cred.decode()}", 'Range':'bytes=30284-'} |
{'Connection': 'close', 'Content-Length': '11', 'Content-Range': 'bytes 30284-30294/2123456789', 'Content-Transfer-Encoding': 'binary', 'Content-Type': 'application/octet-stream', 'Date': 'Mon, 18 Apr 2022 11:07:43 GMT', 'Server': 'lighttpd/1.4.55'}
stop this!
1 | headers = {'Authorization': f"Basic {cred.decode()}", 'Range':'bytes=30295-'} |
{'Connection': 'close', 'Content-Length': '18', 'Content-Range': 'bytes 30295-30312/2123456789', 'Content-Transfer-Encoding': 'binary', 'Content-Type': 'application/octet-stream', 'Date': 'Mon, 18 Apr 2022 14:22:22 GMT', 'Server': 'lighttpd/1.4.55'}
invader! invader!
1 | headers = {'Authorization': f"Basic {cred.decode()}", 'Range':'bytes=30313-'} |
{'Connection': 'close', 'Content-Length': '34', 'Content-Range': 'bytes 30313-30346/2123456789', 'Content-Transfer-Encoding': 'binary', 'Content-Type': 'application/octet-stream', 'Date': 'Mon, 18 Apr 2022 14:23:12 GMT', 'Server': 'lighttpd/1.4.55'}
ok, invader. you are inside now.
1 | headers = {'Authorization': f"Basic {cred.decode()}", 'Range':'bytes=30347-'} |
{'Connection': 'close', 'Content-Type': 'text/html; charset=UTF-8', 'Date': 'Mon, 18 Apr 2022 14:23:50 GMT', 'Server': 'lighttpd/1.4.55', 'Content-Length': '0'}
发现没有内容了,尝试访问2123456789字节外的内容
1 | headers = {'Authorization': f"Basic {cred.decode()}", 'Range':'bytes=2123456879-'} |
{'Connection': 'close', 'Content-Length': '45', 'Content-Range': 'bytes 2123456744-2123456788/2123456789', 'Content-Transfer-Encoding': 'binary', 'Content-Type': 'application/octet-stream', 'Date': 'Mon, 18 Apr 2022 14:25:37 GMT', 'Server': 'lighttpd/1.4.55'}
esrever ni emankcin wen ruoy si drowssap eht
将得到的内容翻转,原句为
the password is your new nickname in reverse
new nickname,应该是指前面的"invader",也就是说密码应该是redavni
接下来向前读取
1 | headers = {'Authorization': f"Basic {cred.decode()}", 'Range':'bytes=2123456743-'} |
{'Connection': 'close', 'Content-Length': '32', 'Content-Range': 'bytes 2123456712-2123456743/2123456789', 'Content-Transfer-Encoding': 'binary', 'Content-Type': 'application/octet-stream', 'Date': 'Mon, 18 Apr 2022 14:26:54 GMT', 'Server': 'lighttpd/1.4.55'}
and it is hiding at 1152983631.
好的,它给出了需要的信息的Range值
1 | headers = {'Authorization': f"Basic {cred.decode()}", 'Range':'bytes=1152983631-'} |
得到了很长很长的结果,查看前20字节的信息
1 | print(r.content[:20]) |
{'Connection': 'close', 'Content-Length': '239733', 'Content-Range': 'bytes 1152983631-1153223363/2123456789', 'Content-Transfer-Encoding': 'binary', 'Content-Type': 'application/octet-stream', 'Date': 'Mon, 18 Apr 2022 14:30:03 GMT', 'Server': 'lighttpd/1.4.55'}
b'PK\x03\x04\x14\x00\t\x00\x08\x00;\xa7\xaa2\xac\xe5f\x14\xa9\x00'
起始的PK\x03\x04是zip文件的文件头->source
那么将这片内容保存为zip文件,解压密码为前面提到的redavni。就能打开了
1 | with open('assets/20.zip', 'wb') as f: |
解压发现readme.txt,就是下一题的题目了。